Bubble Shooter Report
Introduction
Bubble Shooter is a simple javascript game I made. To play the game go to this page. This is my report on the project. To see the report as a pdf, click here.
Table of Contents
- Introduction
- Table of Contents
- Description
- Gameplay / Instructions
- Implementation
- Future Improvements
- Development
- References
Description
Bubble Shooter is a simple game where a player shoots bubbles at a grid to make sets. A set is three or more contiguous bubbles of the same color. When a player taps on the screen or clicks with a mouse, a bubble will be fired at the grid and attach itself to the grid. Every few shots, an extra row will be added to the grid. For every few rows that are added to the grid, new colors will be added. When the number of colors is increased, the game becomes more difficult as it is harder to make sets of three. When the number of rows reaches a certain number, the player will lose. You are just attempting to get the highest score you can, there is no win condition. This project was developed using github and the project has its own github page.
Gameplay / Instructions
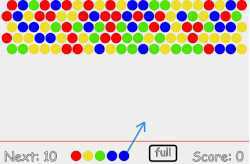
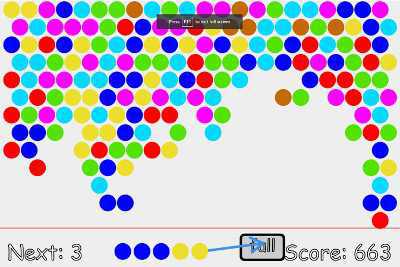
When starting a game, you will see a view like the image below.
Below are the instruction for how to play the game.
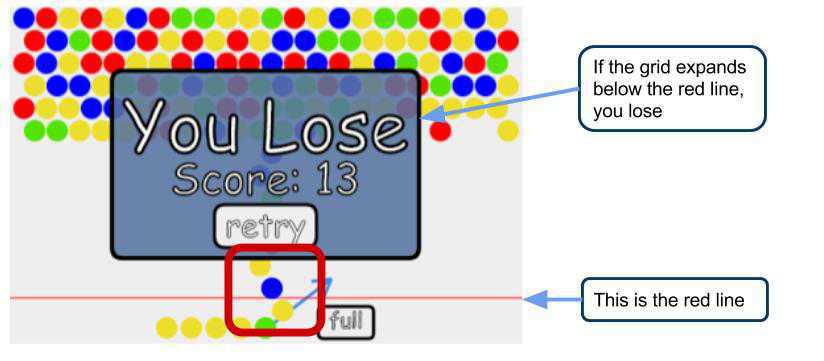
When playing the game, you need to shoot from the arrow and attach bubbles to the grid. The objective of the game is to stop the balls from expanding below the red line.
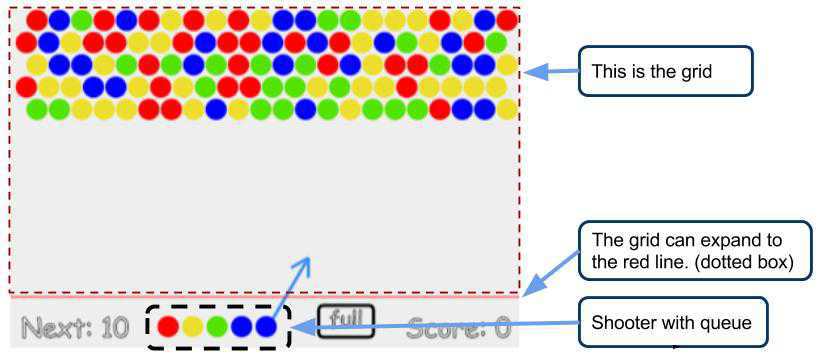
If the grid expands below the red line, you lose.

When you click, you fill fire a ball along the path of the arrow. To move the arrow move your mouse (or finger) on the screen. When you release the mouse, the shooter will fire a ball.

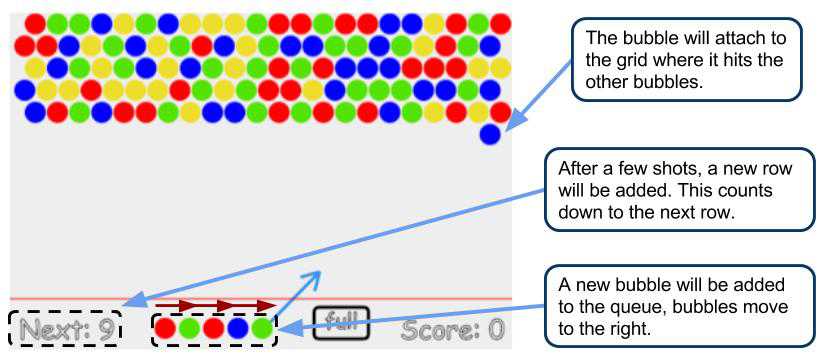
After firing, the ball will attach to the grid. The next ball in the shooter queue will load into the shooter and a new ball will be added to the queue.
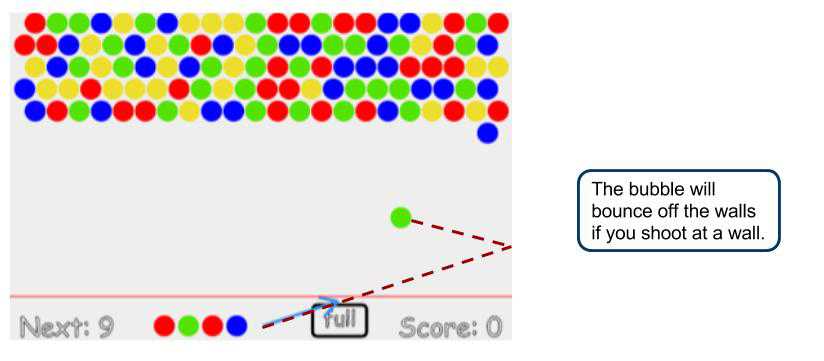
If you shoot a ball at a wall, it will bounce off the walls
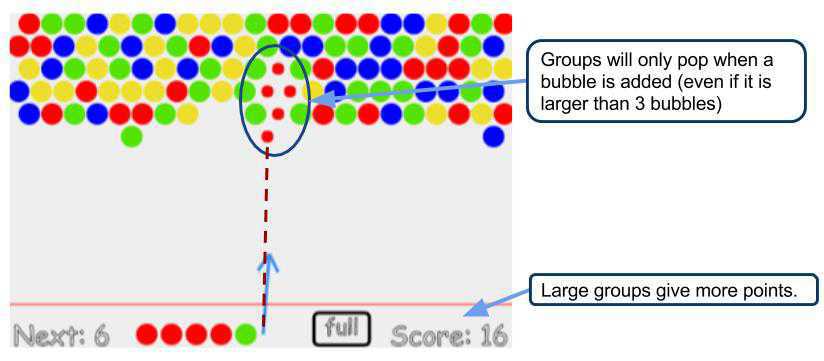
If when you shoot a ball, it forms a set of three or more balls, they will pop. You receive points based on the number of balls in the set ( larget sets = more points).
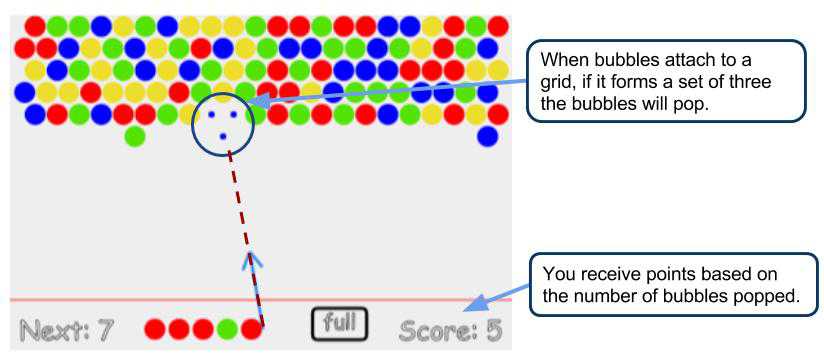
Bubbles will only pop when a bubble is added to the grid.
If bubbles disconnect from the top row, they will also pop and give extra points.

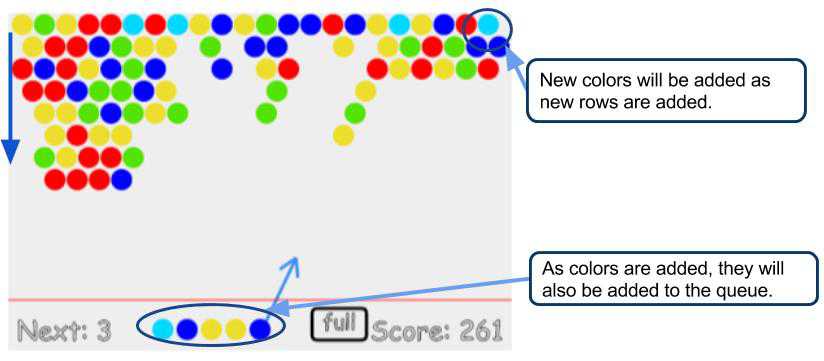
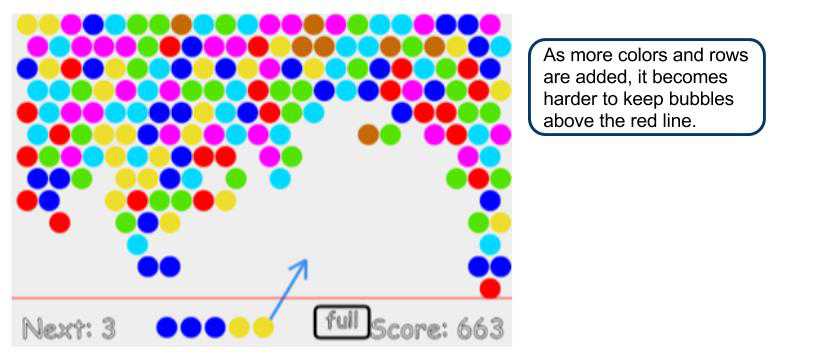
After a few shots (indicated by next) a new row will be added. This will push the other rows down. If the balls reach the red line, you will lose.

As new rows are added, new colors will be added
When the bubbles pass the red line, you lose.
Press the “full” button at the bottom of the screen to make the game fullscreen
That”s the basic rules and controls of the game. Good Luck!
Implementation
Game Design
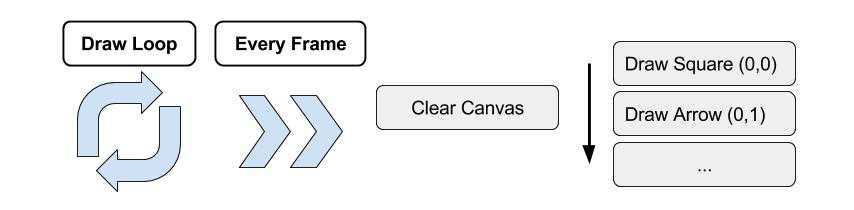
This game is made using javascript from scratch. The source code for this project can be found on github at https://github.com/nicholas-maltbie/BubbleShooterJS. This code utilizes a html canvas to create a scene and draw elements. The game uses a draw loop to redraw and update the game at a set interval. Each one of these draw loops represents a frame. The different elements of the game are added to a list and then drawn by the main draw loop; each element is responsible for drawing itself. This functionality along with some other core features are implemented in the bubble.js file.
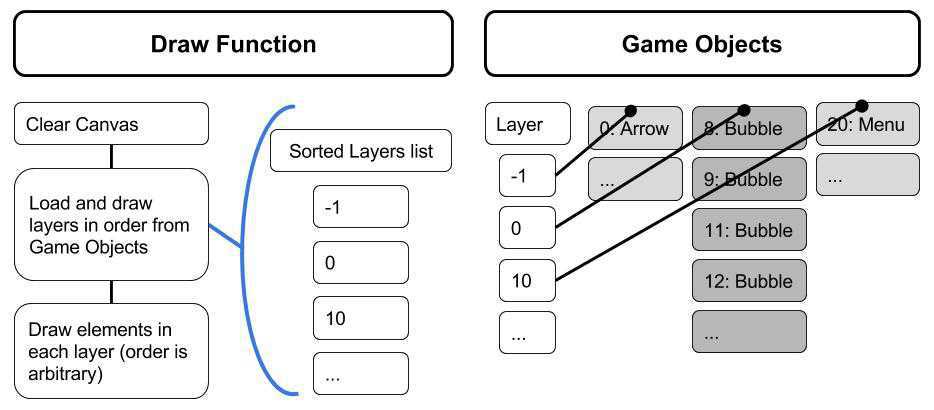
This method had a few flaws because when I wanted to control when elements were drawn. If I wanted the arrow to appear behind the balls, I needed to add it before the bubbles. This was not practical so I used a layer system to achieve this. When adding elements, I specified a layer. Then I used this information to control the order in which elements were drawn. I used a nested hash table, the first level is the list of layers and the second level is the elements in each layer. I used a hash map to achieve fast insertion and deletion. All items, when added to the hash, are assigned an arbitrary id so they can be indexed.
Drawing elements is achieved through js and an HTML5 canvas. This allows for great flexibility and cross platform implementation that is easier than making the application in another editor.
Class Layout
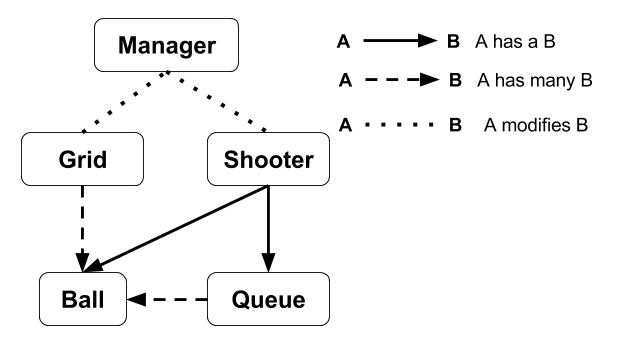
Three main objects are added to the object list and control the game.
- Shooter - Bubble shooter that the user uses to fire bubbles
- Grid = Hex grid for bubbles in the game
- Manager - Game manager that controls interactions between different game elements
[From now on, I use the terms bubble and ball interchangeably, they mean the same thing in context of the game. I used ball in the code because it was easier to type in the code]
These are all represented by different classes and have additional classes to support them. One of the more prevalent objects in the project is ball. This is the colored bubble that can move across the screen and draw itself. Below is a diagram of the interactions between classes.
Shooter Design
The Shooter, Manager, Grid and Ball each have their own files that describe all the classes responsibilities. Each one of these files can be found on the github project page. These classes are used to operate the game. The Manager controls the game progress. The shooter has a state machine to control when the ball can fire. It continuously updates the position of the arrow and, when allowed, fires a ball. The Manager controls when the shooter can fire. This is driven by events in the game.
The shooter is the main way that a user interacts with the game. This interaction is controlled by either a mouse or by touching the screen.
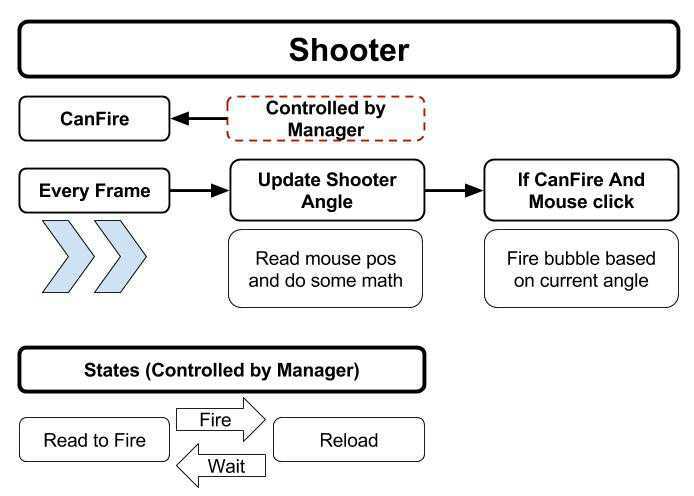
The wait time for the shooter reload is determined by the manager. In the game, the reload happens half a second after the fired bubble collides with the grid. I wanted this game to be playable on the phone so I decided that it would be too costly to check for collisions with every ball. A simple solution for collision detection is to check for collisions between the moving ball and every other ball on the grid. If this is done every frame with a grid (14x22 at maximum) that totals to many (over 2,000) collision checks per frame. If this is supposed to run on a mobile device, this could be rather slow.
Grid Design
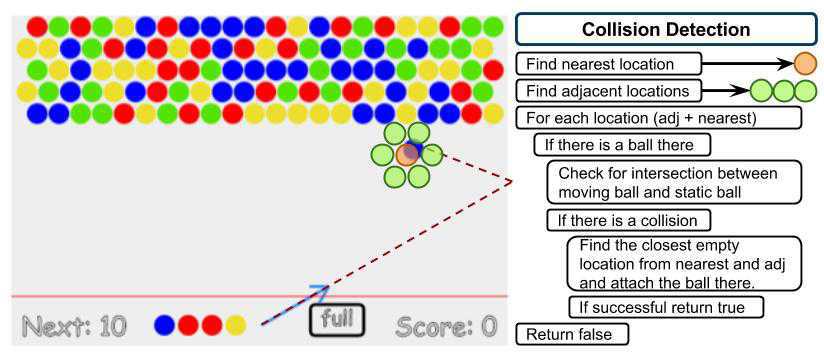
If the grid was a square grid, a simple solution would be to check the four locations that the ball is next to on the grid. The game uses a hex grid so this solution will not work. In order to resolve this for a hex grid, I found the location closest to the ball”s current location; then I took this location and checked for collisions with the adjacent locations. This is only 7 collision checks per frame in the worst case.
Collision Detection
After checking for collisions, if there is a collision, find the closest location out of the adjacent and nearest locations and attach the ball to the grid at that location. Below is a diagram to show this interaction. This is implemented in the intersect_grid function in grid.
Saving the Grid in Memory
After a ball attaches to the grid, the manager will tell the shooter to reload and add a ball to its queue. When the shooter is finished reloading, the manager will set the shooter in the ready state. I did not use a 2d array to represent the grid can be expanded in any direction when balls are attached, rows are added, or when bubbles are popped and removed. In order to achieve these requirements, I decided to use a hash map to save each bubble by its location.
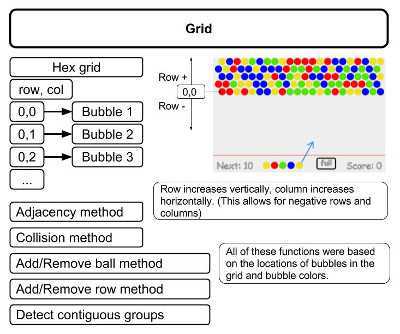
Contiguous Color Identification Algorithm
When attaching bubbles to the grid, the game needs to detect for contiguous groups of bubbles. If there is a contiguous group of a specific color that at the location is larger than three, the bubbles need to be removed. In order to achieve this I used a flood algorithm that uses adjacency rules of a hex grid. I had a bit of difficulty implementing a flood algorithm with recursion so I used a stack and dictionary to track new locations without repeats. This is implemented in the color_food and flood methods in the grid class.

All of these rules, methods and algorithms are implemented in the Grid.js file along with many more values. Majority of these extra values are used to control the grid on screen.
In addition to the contiguous color method, there is also a contiguous ball method which does not use color as a factor. This method is used to determine if a group of balls should fall. If a bubble popping separates a group of bubbles so they are not connected to the top of the row, these disconnected bubbles need to be removed. This is handled in the verify grid method in the grid.js file. If the maximum row in a group of contiguous bubbles is not the highest row, all the bubbles in that group are removed.
Bubble Design
One of the most important elements in the game is the bubble (Also called a ball). This is a core element and is used directly or indirectly by all other elements in the game. The bubble is just a circle on the screen that has the ability to move. There is nothing very special about the bubble but this collection of functionally into one class is necessary to the development of the game. The bubble is shared across multiple files and used to communicate between classes.
One example of this communication is between the Manager and shooter. The manager loads the shooter queue with bubbles. Then the shooter loads itself with bubbles from the queue.
Manager Design
The manager moderates all other interactions between elements within the game. As mentioned before, the manager controls the shooter directly. Additionally, the manager controls when new rows are added to the grid, decides when the player loses, and gives the player a score. This score is determined by user actions and when a fired shot collides with the grid.
One difficulty I had to overcome was making the game fullscreen. By default the game canvas is rather small so I thought I could just scale the canvas size to overcome this. This worked well but I thought I could improve it even more by adding a full screen feature. I decided to just add a full button that the user could press to activate the fullscreen. I implemented this button in the canvas so the screen would look clean without any extra html. The difficult I had was that I could not set the screen to full screen without user input. The button was a scene object and indirectly received input from the user. To fix this, I added a new category of item, buttons. These buttons would receive direct input from the user when the user clicks on the canvas. This allowed me to overcome the problem of indirect interaction with the user. This will also work on mobile platforms but is a bit off as screen resolutions vary from device to device.
The last major element the manager needed to moderate was the “You Lose” panel. This panel allowed the user to restart the game and showed the player”s score. This involved making a reset function. This function removes all elements from the game and then repeats the setup code.
To make the screen look nice, I needed to add a round rect function that would draw a round rectangle on the screen. This is not a default feature in JS. I looked up the algorithm online and implemented the algorithm with the help of online sources.
Future Improvements
If I were to do this project again, I would have made a few changes. It”s not perfect and I hope to use these lessons in the future. One of my major problems was to put more effort into design. I implemented the grid and ball from internet tutorials as this was my first major project in javascript. I did not know what to expect and just hit the ground running. Even if these classes passed my initial requirements, the requirements changed over time because I did not do enough planning before I started working.
Additionally, I would have made the mouse controls better defined. The mouse is just a variable that is controlled by the bubble.js file. This lead to future problems with getting direct user input to activate or deactivate fullscreen. If I had implemented this better I could have saved many hours of troubleshooting.
In the future, I would like to add more game modes as this current version just supports one mode, lose after about 50 turns. I did not put much thought into balancing the game but it is still fun. My main objective was to create a game with js, not to make a perfect game.
Hopefully I will be able to use this experience to improve my future projects.
Development
The entire development of the project can be found on the github page. This development has a commit log and notes for each addition to the project. I maintained development on a dev branch and merged to master whenever I made a noteworthy addition. Anyone can add the game to their own website with the following html commands.
<div align="center">
  <link rel="stylesheet" type="text/css"
    href="https://rawgit.com/nicholas-maltbie/BubbleShooterJS/master/bubblestyle.css">
  </link>
  <canvas id="game-canvas" style="margin:0 auto; background: #eee" width="480" height="320"></canvas>
  <script type="application/javascript"
    src="https://rawgit.com/nicholas-maltbie/BubbleShooterJS/master/grid.js">
  </script>
  <script type="application/javascript"
    src="https://rawgit.com/nicholas-maltbie/BubbleShooterJS/master/ball.js">
  </script>
  <script type="application/javascript"
    src="https://rawgit.com/nicholas-maltbie/BubbleShooterJS/master/shooter.js">
  </script>
  <script type="application/javascript"
    src="https://rawgit.com/nicholas-maltbie/BubbleShooterJS/master/manager.js">
  </script>
  <script type="application/javascript"
    src="https://rawgit.com/nicholas-maltbie/BubbleShooterJS/master/bubbles.js">
  </script>
</div>
An example of this can be found on my own website here
References
chrisdavidmills, allisonlu, fscholz, gbharatwaj, end3r, Sheppy. “Bounce off the walls”. Mozilla Development Network. Game Development. Mar 14, 2016. (source)
“What Is An HTML5 Canvas”. W3Schools. 2017. (source)
“Implementation of Hex Grids”. Red Blob Games. May 6th, 2016. (source)